Family frame display

I wish pictures would do this next justice.  I tried with a couple devices but none came out better than this, and since I don’t have a professional camera, yall gotta bear with me on this one.   

So obviously this ledge was screaming for something to be there.  Before this, we had just placed this brown clock there temporarily… Which turned into over a year because I really couldnt decide what I wanted there. It dawned on me one day that some of my favorite pictures weren’t actually on display in my home and so started the inspiration for this project.   

I did some guesstimating on size, which I would not recommend, but its a difficult location to measure so I was going to make it work with just a width measurement.   For my space, I could comfortably fit about 7 8×10 photos which worked out well for the number of pics I wanted to hang.  I modified the pics to black and white and then had them printed by office Depot.  They came out great! 


I purchased the frames at the dollar store because while they are not the best quality, they are sturdy enough for the location.   

Once I had them in the frames and began to put the first ones up, I realized that while the width measurement would work, I had greatly underestimated the height of the ledge.  So the frames were getting a bit dwarfed. Hmm what to do. 

I strongly considered adding an additional frame around each to give a multiiple frame/ dimensional effect.  But 1. I couldn’t find a larger size at the dollar store that matched these frames and 2. It would have ended up looking cluttered in this particular situation.  

So finally I settled on letters.  I found these at Hobby Lobby for 50% of $3.99 each,  I believe. They had a ton of options in a variety of materials but I needed them to be larger than the frame and black to pop off the white wall.     The letters I found were white finished wood, so I also bought black templates paint. 

After a few quick coats, the letters were done and ready to hang. 

Tips on hanging these…. 

1. Have someone help you because getting off the ladder a million times to check for levelness and location is hard work.  

2. Really measure it out first and mark where you will hang them prior to actually doing it. Guesstimating took a lot of time, a lot of work, and a lot of unnecessary holes in the wall. 

3. I supplemented the nails and screws I used to hang these with mounting squares (or as I like to call them wall stickies). I put them at the base of the frames to keep them a little more secure and from wiggling about. 

And lastly, step back and enjoy your hard work.   Sorry there weren’t more pictures but it was really a pretty straight forward process so it didn’t really occur to me to document it. 

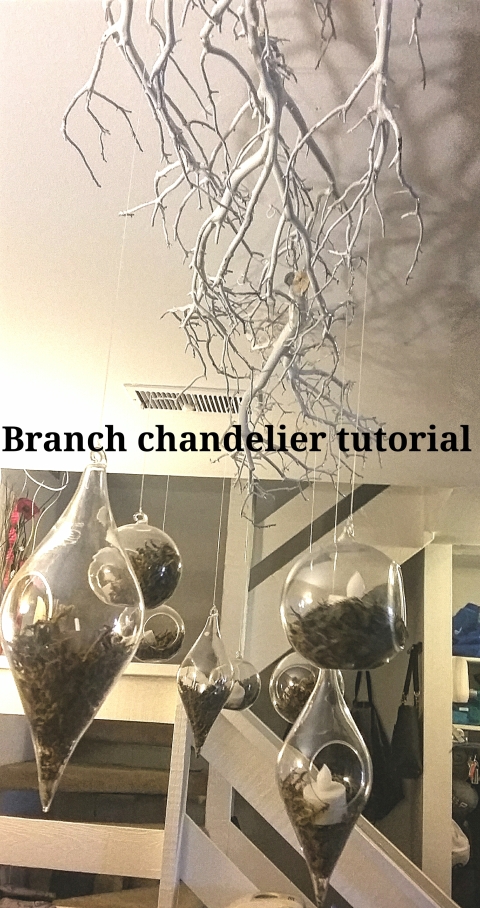
If you liked this post, please like/share/subscribe!   If you are curious as to what those little balls are hanging from the ceiling, stay tuned for my next post about my bubble chandelier! 

‘Cats’ the musical diy artwork

I’m actually super happy with this piece.  If you don’t follow me regularly, then I should tell you that I have lots of cats lol…so they have somehow taken over my walls too lol. I wouldn’t call myself. A cat person,  as I love dogs equally as much, just ended up this way lol.   Anyways, in addition,  my cats have pretty large personalities so they are a constant theme in my life.    

Anyways so I also adore musicals. …and Cats is one of my favorites.  So I wanted to blend the 2 lives into 1 piece of art.   In addition, it needed to be very large.   I have a loft apartment and the upstairs loft has a HUGE wall.  I needed to put something on it and it had to be large as it easily gets dwarfed. So here is what I did.

I had a large piece of bead board…like very large.  I was going to use it as a back splash for my entry closet, but ended up doing something else.  So I had this giant, thin board.  The thinness is important because this thing is large and heavy and has to be mounted on the wall,  so keep your material as light as possible. 

I first printed out a bunch of lyrics that I loved from the play. I ended up with 13 verses. There really isn’t anyway to tell how much space the lines will take up until you write them so  just gather your favorites and prioritize them

 OK,  so first thing I did was sketch out my cat design.  I had to do this a couple of times because I would step back and my design would still be too small.  Also, please keep in mind, I’m no artist, so I kinda winged it.  Then I painted it black and let it dry.

Since the edges are hard to draw clearly, fuzz them up a bit with a small brush.

Then take your pencil and sketch the eyes. This was a bit hard to balance out but after a lot of erasing, got it to an acceptable place. Then paint it in in layers, letting each dry or mostly dry in between. When you get to your last layer, which should be the most visible layer, take one of these scrubbing sponges and draw in lines, removing some of the top layer of paint so you can what is underneath. 

Let it dry completely. 

In the meantime, let’s work on the ears. 

For this, I use a piece of cardboard that I folded up to a relatively fine edge. I took some white paint, and drew some lines until it resembled ear hair.

See…just kinda random lines that you build up.

Then for whiskers, decide how many you want and draw them out from the face with black paint. While you have the black paint, also draw in the little eye circles as well. 

Once you have placed your whiskers, make small fine lines in white to make a nose and mouth and then a few dots for little whisker holes.

Once it’s all dry, move on to the lyrics.

For this, I recommend using either a paint pen or sharpie.  I chose silver because I wanted the lyrics to be more of a background than a focus.

 Write them out. I don’t have the best handwriting but the lines on the board keep it looking neat. 

Be sure to let it dry as well. 

Then hang it up. I was able to just use a bunch of long screws in various places. I tried to use them in inconspicuous places like in ‘O’s.

And here it is on the wall.

Unfortunately light just isn’t great for this picture but it looks fantastic in real life.  It’s almost a little too small, but it works.
I hope this gets your ideas flowong. If you liked this post,  please like, share, tweet, and pin so I know to post similar content.

Thanks for reading!

Solarium decor

So my solarium has had a massive drainage problem for the past year. When my apartment was built, they built the solarium floor at an angle away from the drain….ya… so when it rains, it gathers in the corner opposite of the gutter. Biggest problem there is that it sometimes gets mold or mosquitoes and I’m just worried that eventually it will be a structural problem that causes leaks into my actual apartment.  I’ve been asking my apartment to deal with it for a while but it just now got done….well partially….they built me a beautiful new deck…but didn’t fix the problem so they gotta come back, but it should be a relatively simple fix. I guess I’m okay with that as I got a beautiful deck out of it, just ready for it to be done.  BUT I have been able to put up most of my deck stuff finally, so I can finally share it with yall!  

 Look how beautiful my rug is!  It’s an outdoor rug I found on Amazon. Here is the link if you would like to check it out… Reversible Mats 116093 Blue/Light Green 6’x9′ RV Garden Mat https://www.amazon.com/dp/B004303BNQ/ref=cm_sw_r_other_apa_Q4v5xb2PEAADW

And of course, my little apartment garden! This might move to the end of the solarium so it’s closers to the drain, but for now it works here.  Also, I’m colder months, I have a little greenhouse to keep them warm. 🙂

This is my storage area for my gardening tools.  I used little containers from idea on a metal trellis we found. 

My cute table!   Check out the tutorial here.

And  lastly, probably my favorite,  is my upcycled fire pit.  I am not sure what happened to the pics of this upcycle, so unfortunately, I’ll just have to tell you about it.  This was all rusted out, was missing the bottom rack, and the bowl that goes in the center.  I found it at a thrift store for $15. Both my boyfriend and I walked past it quite a few times eyeing it, but neither of us were sure what to do with it.  But ultimately, we both knew it was too cool to pass up.  So I took him home, cleaned him up, gave him a fun paint job with a teal bottom and black top. But then what to do with him. …

I used him as a planter for a bit, but it was kinda difficult to water. Then I wanted to light him up as a nightlight for the solarium but just never got around to it.  Finally, I decided to use it as much needed storage for my gardening stuff, craft stuff, and my porch shoes.    

So far I love it because it protects from rqin, is easy access, and is still decorative.

I’m pretty happy with the way my solarium has turned out….what do you think?

If you liked this article,please like,share,tweet,and pin so I know to keep sharing this type of content!

Patio table upcycle 

You know those square patio tables everyone and their mom seems to have? The ones you can find a dozen listings on Craigslist for $10-20? 

Well,  as a poor student,  that’s all I could really afford.   As a person, I needed more lol.    Sooooooooooo I decided to make it work. 

First let me start off with my design ideas so you know where we are going.   I do a lot of spray paint crafts outside and i wanted this to be durable and look okay if it got some smudges on it.   Plus,  it’s going outside,  so it needs to be able to get a little grimey and still look OK. So I knew it would be a bit whimsical.    I also knew my color scheme for the patio would be blue and that I was going to have a garden.      

Now let me tell you how much of an artist I am not lol.   So something intricate or super snazzy was not gonna happen.   So I went with simple. 

OK so on to how to do it!

1. Wipe it down well.    Clean off all that dirt and grime!!! 

2. Unscrew the legs.   You have to do this step here because the legs hold the glass in place,  at least on this table.  

3. Put down tarp of some sort because this could get messy! 

4.Remove glass from frame and paint frame and legs. 

I chose black for mine because it shows wear less easily.  I also used a heavy duty metal enamel paint I got at a recycled paint shop for free!  😃

It would probably be easier to use spray paint,  but I used what I had.    I also suggest that if you use spray paint, make sure its an outdoor metal one for durability. 

5. While frame dries,  put glass on a smooth flat surface with the bottom facing upwards and the top facing downwards.  

Once you have your design,  you really need to stop and think about this: the first layer you put down is the design itself and then the background goes on top. If you don’t do this, and paint a solid coat first and then your design on top of that,  your design won’t show through.  Let me show you in pictures so you know what I mean. 

First layer: the squiggles weren’t originally part of my design but things got messy so I embraced it. 

Second layer: keep whites sharp so they don’t fade.   For the record,  it was hard to draw straight lines sooooo I decided to purposefully make it messy. Oh and added more white drizzled to make it look more intentional. 

Last layer: the solid background.   Trust me,  it will show up!

6. Once it’s dry,  flip it over and behold your masterpiece! 

I didn’t mind the see through areas in the black flower but if it bothers you,  make sure you give it a good solid coat before putting on the other layers. 

Also,  the great thing about this is that the design is protected from scratching and weathering since it is on the underside of the table! 

7. Screw the legs back on and you are done! 

8. Place it where you want it and enjoy! 

If you are wondering about 

The umbrella: I got it from At Home for $20. It didn’t come with a stand so I picked one up at a thrift store for $1.

The centerpiece: I added this so the umbrella hole didn’t look so ugly.    It’s just a chip bowl from the dollar store.   I used a box cutter to cut out the center circle. I also added a few drainage holes in the bigger circle.  Then I weighed it down with a few packs of dollar store decorative stones and marbles.    I topped it off with some dollar store fake plants and burlap.   

The smudges: yup,  already got spray paint smudges on it.   But good news is a blade should take them right off and I don’t have to worry about ruining my design. 

Butrerfly: it’s a solar light that I leave on the table because it gets pretty dark out there. I got it at Ross Dress for Less. 

The rug: I got it off of Amazon.  You can find it here:  Reversible Mats 116093 Blue/Light Green 6’x9′ RV Garden Mat https://www.amazon.com/dp/B004303BNQ/ref=cm_sw_r_other_apa_TnT4xb9SR6WHQ

The paints: I got them all for free at my local recycling center which also happens to recycle paint and give away/sell the ones they can still use.   Great way to get free or low cost paint but also help the Planet! Also check out hardware or paint stores (even walmart)  for returned cans,  samples,  and mistints… All are a fraction of the cost. 

Hope this helps!  If you enjoyed this article,  please like, pin, share, and tweet so I know to keep this kind of content coming.   

Thanks for reading! 

How to use Ikea trones all over your home 

So these guys are from ikea and are sold in packs of 3 for $40.  They come in a couple different colors and are made of plastic. The website says they are about 7 inches deep and 20 wide.   If you take into account the protruding handle though,  I think it’s closer to 9 inches deep and 21 inches wider.  I think this is important if you are putting it in a super narrow place. They can be screwed into the wall for more stability and can be stacked on top of each other. 

That being  said,  these things can really go anywhere and used for anything. I chose white because some of the walls I put them on were colored and I wanted them to blend in in the other areas.  

I have 4 sets and here’s how I have been using them. 

By the entryway:

I have this right by the door to hold things I need ASAP and don’t want to walk across my clean carpets with my shoes on to get.    So like windshield defroster, car upholstery cleaner, and lots of water bottles.  In fact,  the bottom 2 are for water bottles.  That way when my boyfriend or I am working on the car,  we can just reach in a grab a bottle. It’s been super helpful. 

In the dining room:

This is right behind my table. They go great with my white mirrors to complete the look.   I use it for extra stuff I can’t fit in my cabinets.  One is holding thermos’,  another easily accessible tools like a hammer,  nails,  and drill. And the last is holding extra ice trays and pitchers. 

In the kitchen:

So I am ‘blessed’  with a washer and dryer in my kitchen…. Ya.   It’s annoying,  but in an apartment,  just glad I have a washer and dryer period.   So this cabinet space that the trones are leaning against is basically space I can’t use because behind it is the water heater. So needed to figure out how to utilize the space so I could have some laundry storage too.    Cue the trones!  They hold commonly used kitchen cleaners and laundry detergent.   Plus they fit very nicely in that very flat,  narrow space.  

In the office closet:

You know that awkward side space in a closet?   Well you can put shelves or hooks there for more storage…. Or you can out trones!  I like this because they kinda hide the mess and hold more than shelves or hooks.    In mine,  I have extra filters and light bulbs and an entire one filled with spray paints.   

In the bedroom:

As a night stand in small spaces.    This works well because there isn’t a lot of space next to my bed.  So I threw 2 trones up there and it’s worked great!  

These are just how I use them but they can definitely be used in a bathroom,  closet,  or really anywhere you can think of. 

I love my ikea trones and I think they are well worth the price tag. 

If you enjoyed this post,  please like, tweet, share, or pin so I know to make more like it! 

As always,  thanks for reading! 

From Rustic to shabby chic: bench upcycle

I was looking for something to put at the foot of the bed to hold decorative pillows and sheets.   I wanted a bench so you could also sit and put socks on if need be.  I found this little guy on Craigslist for $10.  

He needed some loving and definitely did not fit the style of my home so I knew he was gonna need an upcycle. This is how he started out…. 

So definitely bare bones… Put pretty bare bones that weren’t gonna need a ton of work.  

Now I know some of you are thinking…. But it matches the bed frame in the pic alright… Well yes,  it does…. But the bed frame is a future project that is not staying that color either,  so bear with me lol.   I’m showing you the pieces of what will eventually add up to a whole room that I show you guys! 

OK so I chose 3 colors of paint that I already had because I wanted it to match and really because I’m a poor college student.    Fortunately, the colors I already had were gray, black, and white.   The gray is on a nearby wall and matches the bedspread and the curtains so pulling that in unified the room.   Then the bed will eventually be black or white so that tied in.   And my dressers are a very dark mahogany and my bedspread has black in it so it all tied together nicely.   

So this is time consuming because there is an inside and an outside so definitely took me about a week to complete because of drying time.   

I decided to paint the entire outside gray first.  Then I painted the inside lid gray and the inside drawer white.    

This required a couple of layers going back and forth between outside and inside because of drying time and the wood absorbing some of the paint. I think I did about 3 layers. 

Then for the black,  I decided to paint the pieces on the sides that stuck out as an accent. 

There are a couple more you don’t see in the pic,  but you get the idea. 

Then I needed to make the cute design on the top pop a bit.   My boyfriend was concerned that the sea theme wouldn’t match my decor,  and in truth,  it is different in that we have nothing else beachy… But u think it gives it just a bit of whimsy, so I like it. 

Here is the lid after I traced the design in white. 

It looks a bit splotchy here because it was still drying.    But that’s it! 

I added a few small baskets from Ross ($3 total)  and a cat pillow from ikea. 

Now it sits at the foot of my bed holding my sheets!  Now if I can only find time to paint the bed,  then you would get to see the final project!!  Haha I know, I’m working on it! 

If you enjoyed this upcycle, please like, pin, share, or tweet it! 

Thanks for reading! 

Cheap bathroom hacks and organization 

So I love my bathroom… I mean,  it’s not perfect,  but for an apartment, it’s a pretty good size and a massive improvement from my last one… Where you could close the bathroom door from the toilet seat! Yikes! 

This one is a good size,  has a vanity,  and a window,  and an adequate layout.    What it was lacking was storage… In a big way.   There was literally just this little cabinet under the sink :(.    What’s a girl to do? 

Sooooooooooo I made it better.   I really wanted my bathroom to feel luxurious and still functional,  so I had to make it a bit dramatic and really think about how I used my things daily to come up with a good plan.    This is my final product and I really love it.    I have been using it for a good while now and can’t find any necessary improvements so that means it’s time to share with you! 

Fist things first…. I painted my wall a dark dark blue… Like navy.  I chose this because it made me think of the ocean and gave me a very calm serene feeling. 

Let’s start with the first thing you see…. That shower curtain! 

Nothing says luxury like a ceiling to floor shower curtain.   I actually made this out of outdoor canvas tarp I got from a fabric store.    I literally just cut holes and put grommets in it.   I think it is the show statement in the room!  From the inside of the shower,  you get a feeling of complete privacy and luxury as well.   Put it on a curved shower rod for extra points!  I believe with the tarp,  grommets,  and shower rod this cost me around $60. A little pricey for a certain,  but not if it’s the statement piece of a room, which this is. 

Use any extra to make a box panel for the curtains.   I used a cardboard box,  some nails and some staples to get this look… Yup… That easy. 


Now for that other statement piece…. The giant toilet paper holder!  

So this was actually a mistake.   I saw this cute pin in pinter st that had a small version of this,  and instead of actually reading the measurements,  I just had my boyfriend build me a box frame of what I approximated the measurements to be…. Which was WAY OFF!  Lol.   But… It came out pretty good and I can’t complain.    I just spray painted it an doing it on the wall.    Be sure to secure well as that much toilet paper can be a bit heavy.    For those who are wondering,  I believe it hold about 48 roles. 

OK so on to the storage issue…this is a great simple idea for creating some more space.    I got the baskets at Ross for $25 for all 3 and the bars and hooks at ikea for $2.99 /each.    So this cost about $35. I could have thrift Ed the baskets but with all the projects on this list,  this was a worthy splurge.   Now I have plenty of storage for the much needed extra products I have! 

For those wondering what that cup is on the side of the mirror… Well I have a very small space around the sink and hate putting my tooth brush lying down in a cabinet… So I literally just took a small ikea Planter (about $2) and put a small nail through one of the holes and into the cabinet.   It’s very small so it doesn’t do much to the cabinet and it fits my needs as a toothbrush holder. 

Now for the dreaded under the sink space.    OK first let me explain all the air freshener…. Lol…. After Christmas, they were on sale at Walmart for like 25¢ for the 2 cans of febreeze packs…. So I bought like a million naturally.   This is all that’s left! 

Use stacking bins from the dollar tree for easy to grab items and boxes for less common rolly polly items. And always keep a cleaner within reach. 

So I had this big empty wall space which obviously means I need to find a way to make more storage there.   Because it’s near the entry to the room,  I wanted to keep it close to the wall so as not to effect the size of the room.    3 tiered shelves worked perfectly.    Add some pretty jars and you are set.   I believe u found these on Craigslist for $10 and the jars for free from some lady who was purging her house! 

And the vanity!  My main storage section.    Excuse my poor pictures as I only do this with my phone until I can invest in something better and take the time to take better pics 😕. 

So this took me a while to perfect because honestly there was just so much stuff and it’s kind of an awkwardly sized space. 

 So the white cube piece is from big lots.  I got it when they were having a bogo 50% off sale so got 2 for $45. The other one is being used in my entry.  To keep things neat,  either put it in a pretty jar or in a box/basket.  This makes it feel less cluttered.  I could have invested in nice baskets or bins for a uniform look but I felt that for me,  it would be less functional that way.   

The brown drawers (2 sets)  are from Walmart.  I believe they are about $20 each. I used these for all my extra makeup and supplies that are more in need of a drawer.   

For quick items,  throw them in pretty jars on top so you can access them easily.   I believe these are ikea planters I spent about $2/each on. 

This section cost me about $75.

Other things to note in this area…

In orange- I had this specially made for me like 10 years ago but it could be an easy DIY project to make an earring holder.   Also note the little baskets.  These are from the dollar store and literally pinned into the wall with push pins.   They are perfect for cords,  sponges  or whatever miscellaneous items you want to throw in there. 

In blue – my makeup stand.  I am a super procrastinator in the morning so having all my makeup out and ready is super important.  I found this shelf at Walmart for about $8. I organized it by part of my face… 1st shelf is base coat/face stuff. 2nd shelf is blush, shadow, brows. 3rd shelf is eyeliner, mascara, and setting spray.  Also notice all the cute containers holding my brushes…. Those are spice jars I cleaned and saved!  I have the brushes organized by purpose as well. 

The green- I just have to share about my mirror.  I found this guy at a thrift store for…. $8! And it worked!  No flaws… Nothing. Just needed to be cleaned up a bit.  That’s a great testament to the goodness of thrift store items! 

And lastly behind the door… A girl needs a place for all that jewelry!  So use coat hooks and or bars to make them whisky accessible.  

Overall this bathroom cost me probably close to $250 to redo…. But it was over at least a years time frame and took a good amount of fine tuning to get right.  But now I love it and it is everything a girl could ask for…. Oh and sometimes my boyfriend can use it too!  😜

Gluten free Thanksgiving 2015 and decor ideas

Hey guys, 

So this was my Thanksgiving last year and I wanted to share it with you to give you ideas for this year’s Turkey day! 

So let’s talk decor first!  I wanted to keep it simple and clean so we could focus on the food! 

So I started with some butcher paper and laid it the length of the table and cut it.   

Then place your table settings how you want them.    I’m a poor college student, so I just used my everyday dishes but if you keep it simple,  it should still look acceptable.  

Once your table settings are laid out where you want them,  add your centerpiece.  Mineis my usual wicker basket filled with pinecone,  but I supplemented some fake guords from the dollar store for a more festive feel. I also threw some placements underneath it to draw attention to the centerpiece.   

Then I took a permanent marker and wrote out the ‘Give Thanks’  section.    I did this last to make sure I had enough room and that it was placed where I wanted it. 

Finish off your decor with a cute glass/vase with markers for people to write what they are thankful for in the blanks.  

We enjoyed doing this before we ate because it gave us a chance to appreciate to really be in the moment and enjoy our meal. 

And that’s it for decor!  Easy Peasy! 
Now to the good stuff… The food! 

Two things to note: I always have a completely gluten free meal and try to make it healthy to boot.    And I always cook for an army (because who doesn’t love leftovers?!) 

Now I’m not gonna share all the recipes because honestly,  I kinda wing it, but the goal is to give you some ideas on gluten free options! 
Turkey- most are gluten free,  just watch out for glazes.    We got ours from schnucks and it was good,  but other times I have gotten from honeybaked and it was good as well.

For dressing-there are many gluten free turkey gravies you can buy, but we use my grandma’s recipe which basically uses leftover turkey juices mixed with cornstarch, water, booked egg, onion, celery,  and butter. Salt and pepper to taste. 

Ham- we got ours from schnucks,  but honestly,  honey baked hams have much better (and more pricey)  ones.   Be sure to double check glazes! 

Honey mustard- super simple honey mustard if you like dipping your ham in that. Just mix w parts mustard, 2 parts mayonnaise,  2 parts honey and mix it all together.    Taste test as you go to find the level of sweetness best for you. 

Green bean casserole-  alright so I love gb casseroles,  but it can be hard to get the yummy goodness of non gf versions with some of the watery versions of gluten free cream of mushroom soups.    But this year,  I tried a local brand that was much more thick in consistency so was able to achieve the same flavor. Top with gluten free crunchies.  You can find lots of options for these on Amazon.com.

If you wanna kick it up a health notch,  try my green beans with almonds and cranberries.    It is literally that simple… Throw it in a skillet with some olive oil and cook until soft.  Toss in some almonds and cranberries and cook for just another couple of minutes. Serve!  That simple. 

Gluten free stuffing… Well this one is definitely a cheat… I use the boxed one with store bought GF bread and honestly.. It’s really good so I don’t see a whole lot of reason to go out of my way on that one.   The one I most like is the schnucks brand,  but if you don’t have a schnucks,  a Amazon sells the glutino one which is pretty good too.   They also have gf bread crumbs you can buy,  but I usually just use actual gf bread. 

Creamed corn. So this is a slightly different take on corn because honestly I don’t like creamed corn,  but this one is really good and should probably be called more a cheesy corn.    Cook your corn,  whatever kind you are using and put kernels into a skillet.   Then add butter, maybe 1/3 cup of milk, and pepper jack cheese.   Let cheese and butter melt and stir frequently to get milk to absorb in there too.    Once it’s a nice cheesy mess,  sprinkle with parmesean as well. 

Yams.   So again,  not a big fan of marshmallows or candied yams,  so this is my yummy healthy alternative.    I literally just cook them in olive oil…. Ya I know,  crazy that it’s that simple,  but they come out a little sweet and very yummy.   You can bake them until tender (maybe 45 min at 275) or you can cut them up and toss them in a skillet and cook until tender.    

Mashed potatoes,  well that’s pretty much a given.   We used real potatoes and cooked then with just a bit of milk and butter.    This year I will b probably do cauliflower ‘mashed  potatoes ‘ but it takes some prep work for that. 

This meal may seem like it has all the same things you usually eat for Thanksgiving,  and it does…. Minus a ton of the sugar and butter that can so laden so much of turkey day food.   This meal is a much healthier alternative while still helping you feel like you had all the staples! 

I hope that helps give you some ideas on what to make for your gluten  free Thanksgiving!  If you like this post  please like,  follow,  and share! 

Small kitchen space hacks


So if you are like me and suffer from a tiny apartment kitchen, you know that every inch of space is needed.  Especially if, like me,  you spend a ton of time cooking…. Which means you have a ton of gadgets and pots and pans and baking dishes… All things that take up very valuable space.    And as a cherry on top of all that,  my washer and dryer unit is also in the kitchen (who decided that was a good plan?)!  So here is how I have managed to make my kitchen functional and not too cluttered…. It took lots of hacks and is a constantly evolving process,  but it’s been working out pretty well thus far. 

Hang a file holder for go to recipes or take out menus. 

A plastic bag holder to help save the environment! 

These are from ikea (but I believe they are retiring them now,  but will no doubt have something equally useful). I did this in order to open up another drawer for storage instead of having a silverware drawer and it has been a fantastic alternative! I think I spent $7 on this setup!

These are also ikea.  I believe they are the grundtal collection. I use them for potatoes and onions. 

These are ikea grundtal as well,  to help add some storage space above the sink. 

And another row of just hooks for the big pots to save cabinet space. 

Also notice the cutting board and baking pan storage… This is just a large basket but it clears out space in a cabinet and also is easily accessible when you are cooking. 

Enhance awkward wasted space by placing lesser used items up there.   This had just the one shelf with tons of open space on top and so I added a shelf.  Since there is no place on the counter or under a cabinet for the microwave,  I threw it up here and it works great and is out of the way. Note also the baskets for your plates! This is a great idea that I am so so glad I decided to use.   It’s easy to grab a plate and to put them away,  they take up less space,  and look cute too.    I would really never go back from this tip!

Utilize the tops of everything… Washer, fridge, cabinets… Everything,  to give yourself as much space as possible. Plus sometimes those spaces just look awkward without something in them. 

Inside the cabinets should be equally as organized. 

Places Tupperware inside of each other and keep the kids together in a basket near by. 

Use similar containers and labels for a more organized look and more space than bags and boxes.  I know it seems like a hassle to take that 1 extra step to dump bags and boxes into containers but it saves you lots of hassle later and looks nicer effortlessly. 

For super awkward spaces, like above the stove, use a turn table/ lazy Susan to help you store more easily. 

The most difficult area, at least for me,  to tackle in the kitchen are pot lids… They are just cumbersome and always in the way. This is my functional solution, albeit not super pretty. 

 I got it from ikea.  I believe it is used for separating pans,  but I find it works pretty well for all my lids  too.    Also note that I have utilized every inch of storage by fitting my extra paper towels into awkward spaces.  This is important because it keeps the counter less cluttered,  allows me to store how much I need,  and is not hard to get to when I do need it. 

This is how I store my actual pans.  It is the same ikea pot holder but screwed into the wall.  I love this because it’s easily accessible and opens up much needed cabinet space. 

Also be sure to make room for super awkward things by hanging them on the wall.    This is a vegetable grill basket that we use every now and then but in the mean time needs a place to stay that is out of the way.  This worked perfectly. 

Similarly,  this metal hot pad works perfectly on the wall and doubles as decor. 

You might also have noticed the triple layer fruit basket.  I found this on Amazon and works perfect for us as we go through a ton of produce.    Again,  think vertically to save space. 

This is on the underside of my bar cabinets.  It is a magnetic knife strip I got off of amazon.  It works perfectly because knives are super accessible but also put away neatly.   Plus I think it gives the kitchen a bit more of a chef vibe. 

Next up, use interesting and different displays to hold utensils.  

Variation keeps it fun,  but try not to go overboard as it can look cluttered and unkempt.   A vase or Planter is a fantastic way to hold your utensils for easy access. 

Spices can be a difficult storagevoriblem.  I found that this works best because they are very accessible and look relatively neat.  I bought a picture ledge from ikea that I cut in half and hung.  Then little jars from ikea to store the spices.  Don’t forget to label them! 

This is an older picture so the spice racks have changed to the ones we just talked about,  but I wanted to show you how I hang measuring cups and hot pads.  I believe everything you see there is from ikea as well. 

 if you will recall, my laundry is in the kitchen so heres how I deal w laundry soap, dishwasher tabs,  and other immediate cleaning products…. I use ikeas trones. 

They are small and really don’t get in the way and yet provide lots of storage! 

 And lastly,  don’t forget to utilize the outside of your fridge for important things like a schedule, grocery list,  and even grocery coupons.   This is one place I know both my boyfriend and I will look regularly so having them here makes sure they are seen. 


And that’s it!  I hope you found some of these ideas useful and if you enjoyed this entry,  please like, share, and follow for more fun stuff! 

Thanks for reading! 

Hanging branch and candle chandelier

image

Remember last time when we were talking about accent and statement pieces?  Well this is probably the one that has the largest impact…. Mostly because the dining room is basically the first thing you see when you walk in the door.   Because it is the first space you see,  it needs to set the tone…so I wanted something unique,  creative,  nature related,  but still had that expensive elegance feeling… Like a natural elegance I guess.
This was my inspiration…. I can’t seen to track down the original source,  but this is the sight I found it from on pinterest.

image

Okay,  so this is absolutely stunning.    She has the lighting and space down perfectly.   My space on the other hand does not have the lighting that makes this an easy picture to take.    It also does not have a good angle to take it from where you can see the whole thing because it is impeded by the stairs and the bar.   Plus,  this was a much more difficult and expensive  project than I initially thought it would be.

Let’s begin by choosing a space… These are both done over the dining room tables and have the table running the same way as the branch.   Make sure that your ceiling is high enough to hang the branch(es)  as well as the baubles.    I think mine takes up about 3 feet from the ceiling and the baubles hang just above eye level.
This is important because you don’t want guests hitting their heads when they stand or being blocked from seeing each other.

Next decide how long you want it.   My branches run about the length of the table and my baubles are spaced evenly throughout.   The length will help you determine the size of your branch and the number of baubles.    For mine,  I also lined it up with the display mirrors behind it so the baubles would hang so you could see them in the mirrors and so the branches lined up with the table and the mirrors….lots of adjusting.

image

Once you have your length,  decide how many baubles you want and how far apart you want them…  This will probably be an approximation.   I used 3 of these baubles

image

and 5 of these.

image

I found both sets on amazon and eBay but ended up buying them on eBay because they were cheaper.   I have had these for a while but I ended up spending around & $5 per angled bauble and about $2.50 per round bauble.    You can find them cheaper but I wanted them to be glass and to have a clear glass hanging top so it was no  obstructed by metal hangings.

Now here’s the hard part.. The branch.   At first my plan was to be super creative and find a big branch outside to use… But this was a task and a half and there are a couple of reasons i ended up opting for buying one.
First,  it was super hard to find a branch that was long,  and relatively branch less enough for use.
Second,  it needs to be relatively light because it will be super hard to get it on the ceiling otherwise.  At least,  without having giant distracting hooks in the ceiling.
Third, it needs to be transportable… Which is pretty difficult unless you plan on strapping it to the car or have an SUV.
Fourth,  bugs…. So if you plan  on using a real branch,  you really need to plan on roasting your branches to make sure bugs are not gonna fall on you in the middle of a meal.    The most common way to do this is to bleach it in the tub and/or roast it in the oven.   Well…  The branch I was looking for,  was too big for the bath tub and WAY too big for the oven! Sooooooooooo what to do?  I could have cooked it outside in the sun… But that requires no rain and well that’s not super easy to predict.
So ultimately I decided this was a lot of reasons to just buy one.  BUT… problem not over…. Where the heck do you get branches like this without spending a fortune?   Well I finally found a place one called blooms&branches who sold them for a slightly cheaper price,  especially if you catch them on a sale!
I ended up buying 2 because they didn’t have one single one that was large enough at the price I needed.  These branches are a bit more ‘branchy’  than the one in the original pic,  but it didn’t bother me too much.
This cost a good amount more than free branches,  but saved me a ton of work and heart ache.  I don’t often choose to buy over making it,  but sometimes it’s just worth it.
You will also need some strong fishing wire and  some white hooks and scissors of course,  to cut.

First step was to figure out how to hang the branches.  I hung them base to ends so they looked more continuous.  I also hung them with the fattest side facing the ceiling.   Choose some sturdy areas to tie strings to and  make sure you have balance by choosing an approximately equal number on both sides.
These strings were pretty short,  maybe an inch or two from the ceiling.    Place the hooks in the ceiling in corresponding locations.   I ended up using a lot of hooks,  about 15 because they were small and not super strong.  Plus I wanted to make them balanced.   I also ended up using those wall screw secure plastic things to make the hooks sturdier.
I didn’t end up needing all the hooks,  but used them for extra security.

Once you have it nice and secure,  plan out your baubles.   Decide where and how low the baubles you want to hang and cut your string accordingly.   Then hang them up securely.

Now the fun part!  You can fill them with whatever you want.   I used peat Moss that I got from the dollar store,  and a set of battery operated-remote control tea lights.    I got these from Amazon… FYI remote control ones are hard to find and kinda expensive,  but I was not about to turn every one on when i wanted to use them.

image

Place your Moss and your candles in and you are done! I accepted it with a long basket full of pinecone as a table centerpiece.

image

Not as sharp as the original,  but for my small apartment,  it is perfect.   People compliment it all the time!

Let me know what you think!  And if you liked this tutorial,  please like,  comment,  or share as I love to hear from my readers!