Looking for a last minute valentine for Valentine’s Day? This cute and easy valentine will give the bang of a more time consuming project and is so easy you can whip them out in just a few minutes!
So presenting: ‘Worth Melting For’ Olaf Valentines!

These are super easy and sooooo cute!
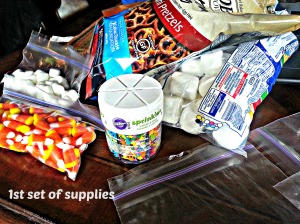
Here’s what you’ll need:
Snowman:
-large marshmallows
-mini marshmallows
-pretzels (I used regular curvy ones, but you can use stick ones too)
-candy corn
-small chocolate pieces (you can use chocolate chips or sprinkles)
-toothpicks
-snack plastic bags
Message Card:
-glue dots (or other clear drying glue or tape)
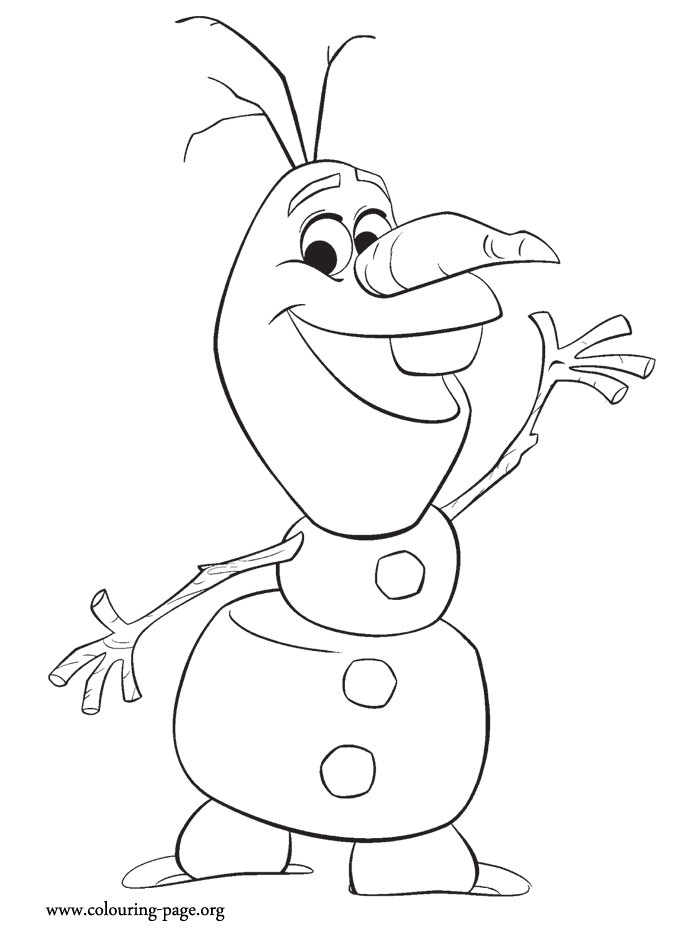
-Olaf printable like this one… http://www.colouring-page.org/sites/default/files/frozen-coloring-pages-21.gif
I suggest putting a bunch of small ones onto a word document and printing it out
-coloring pencils (to color Olaf!…or you could just print a colored one)
-winter themed scrapbook paper
-white scrapbook paper
-scissors
-pencil
-stapler
-straight edge
Box:
-small box
-string
Ok lets make these things!
Let’s Build a Snowman First!
1) Separate out the pieces: I am going to do this tutorial for one at a time for simplicity’s sake.
 Separate out 3 large marshmallows for the snowman.
2 small marshmallows for the legs.
2 pretzels for the arms.
1 candy corn for nose.
2 toothpicks to connect your snowman- break them in half
2 black sprinkles for eyes
3 black sprinkles for buttons
5 black sprinkles for a mouth
2) Place all of the above in a snack bag…stack them kinda like a snowman for a cuter effect.
 To do this, I turned the top one vertically for the head, the middle one on it’s side, and the bottom one horizontally.
And then of course the little ones as feet beneath it.
3) If you are making multiples, now is the best time to make a bunch.

Now let’s make a card…and not just any card, an Olaf card!
 4) If you are coloring Olaf, grab your colored pencils and your coloring template and start doodling! If you printed it in color then I guess you can skip this step.
For your information, Olaf has brown wooden arms and twigs in his hair. An orange nose. A black inside of his mouth and black buttons.
Once you have colored him, cut him out carefully. Use his whole body and you can trim to fit later on.
Again. for multiples, it’s best to do all of the same thing t once so get your inner kid on and start coloring! Or get the kids to do it!
5) Choose your background for the card. Make it a winter themed one. Mine is a blue shiny snowflake one, which has a nice shiny colorful sheen to it. I made 4 valentines, so I only needed one 12 x12 sheet.

 6) I measured the bag against the paper and cut the paper into 4 rectangles. Remember that you are going to fold it over onto the bag so make sure it is large enough to halve. Use a straight edge to draw your lines and then cut along the lines to cut out the rectangle.
7) Once you have the rectangles cut, fold them in half and compare to your plastic bags again just in case they need trimming.

8) Next grab your white piece of construction paper and draw a cloud. Make sure it fits onto the card but is also large enough so that you can write on it. Cut out the cloud (or clouds for multiples).
9) Decide what you want to say and write it on the card. I wrote a play on the ‘some people are worth melting for’ line.
10) Now gab your gluedots or glue and Olaf. Decide where you are going to place Olaf on card and place the glue on the back accordingly. Then place Olaf on the card.


11) Then grab your cloud and put glue on the back of it and place it on the card as well. Almost done!
12) Grab your stapler and staple the card to bag on the sides.
You Are Done!
Unless…you want to up the cute factor a notch! 😉
I am mailing mine so I wanted a cute box to put them in.

 I used an old check box and covered it in a brown paper bog. I cut it in half and then folded over the edges and stapled them onto the box. Then grab some twine or string to tie the box closed. You can also write the address right on the box. Now here is the fun part, add the ‘Do you want to build a snowman’ message to the outside of the box!
And this is your finished product! Yay, all done and so so so cute! 


 so there are these 3 pirates.


